
Article
Getting Started with the Ocarina: A Beginner's Guide
New to the ocarina? This guide covers everything you need to get started, from choosing your instrument to playing your first notes.
Written by Maycon Lopes.
- Published
- Updated
If you’re just getting started, welcome! I’ve been playing the ocarina for over ten years, and I put together this guide to help you take your first steps without making things complicated. You don’t need to master music theory, buy the most expensive instrument, or play fast. With a suitable ocarina and a little regular practice, you can start learning your first notes and playing simple melodies.
We’ll take it one step at a time: first, choosing and getting to know your instrument; next, working on breath control, intonation, and rhythm; and finally, building a practice routine and finding other people to learn with. If you learn best by watching and listening, you can start with the video below and then come back to whichever sections you’d like to review.
YouTube
How to Play the Ocarina: Everything You Need to Know to Get Started

Explore the Guide
- Choose an ocarina to learn on
- Get to know your instrument and adjust your posture
- Start with the natural notes
- Control your breath and play each note in tune
- Articulate notes and practice rhythm
- Try three exercises for your first practice routine
- Take care of your ocarina
- Keep learning with other people
- Follow a simple plan for your first week
1. Choose an Ocarina to Learn On
Ocarinas come in many shapes, tunings, materials, and hole configurations. When choosing one, I recommend prioritizing a reliable instrument with consistent tuning and an available fingering chart. If possible, ask an experienced player for advice. That can help you avoid buying a decorative replica or a poorly tuned instrument that makes your first lessons harder than they need to be.
For most beginners, I’d suggest a 12-hole Alto C ocarina. The “C” refers to its key, while “Alto” describes its pitch range relative to other sizes. This model has a useful range for many melodies, and there’s plenty of learning material available for it. But don’t feel limited to that option: 10-hole and 11-hole ocarinas can also be excellent instruments. What matters is checking the tuning and using the manufacturer’s fingering chart and instructions for whichever model you choose.
One thing I’ve learned is that the material and number of holes alone don’t tell you whether an ocarina is good. Its design and the care taken during manufacturing matter too. Think about how you’ll use the instrument and what your budget allows. A plastic ocarina, for example, can be convenient to carry around, while a ceramic one requires more care to avoid accidental drops.
If you’re still unsure what to buy, I explore this topic in more detail in the guide I Discovered the Ocarina. Now What?, including references to different models and manufacturers.
What to Check Before Buying
Before making a purchase, here’s what I’d check:
- Are the tuning and key clearly stated in the product listing?
- Does it come with a fingering chart specifically for that model?
- Are there demonstrations of notes or melodies played on that instrument?
- Is it clear that the model is a musical instrument rather than just a decorative replica that produces out-of-tune notes?
2. Get to Know Your Instrument and Adjust Your Posture
You already know that the ocarina is a wind instrument: air travels through the mouthpiece and strikes an edge, causing the air inside the instrument to vibrate. Opening or closing the finger holes changes the notes it produces. The principle is simple, and with a little practice, you’ll start to feel how your finger movements affect the sound.
If you’re curious about the instrument’s origins and history, you can also read my article What Is an Ocarina?.
Hold the instrument with both hands and use the soft pads of your fingertips to cover the holes completely. Your thumbs support the instrument while covering the holes on the back. Try to hold the ocarina securely without squeezing it. If a hole isn’t fully covered, the note may not sound properly. Before blowing harder, check that your fingers are sealing the holes.
Keep your shoulders relaxed and your arms and wrists comfortable. With a transverse ocarina, adjust the angle so you can reach the holes and breathe without tension. If you’re sitting, keep your feet on the floor. The goal isn’t to hold yourself rigidly, but to find a position that lets you play without pain.
Imagem
Good Posture for Playing the Ocarina
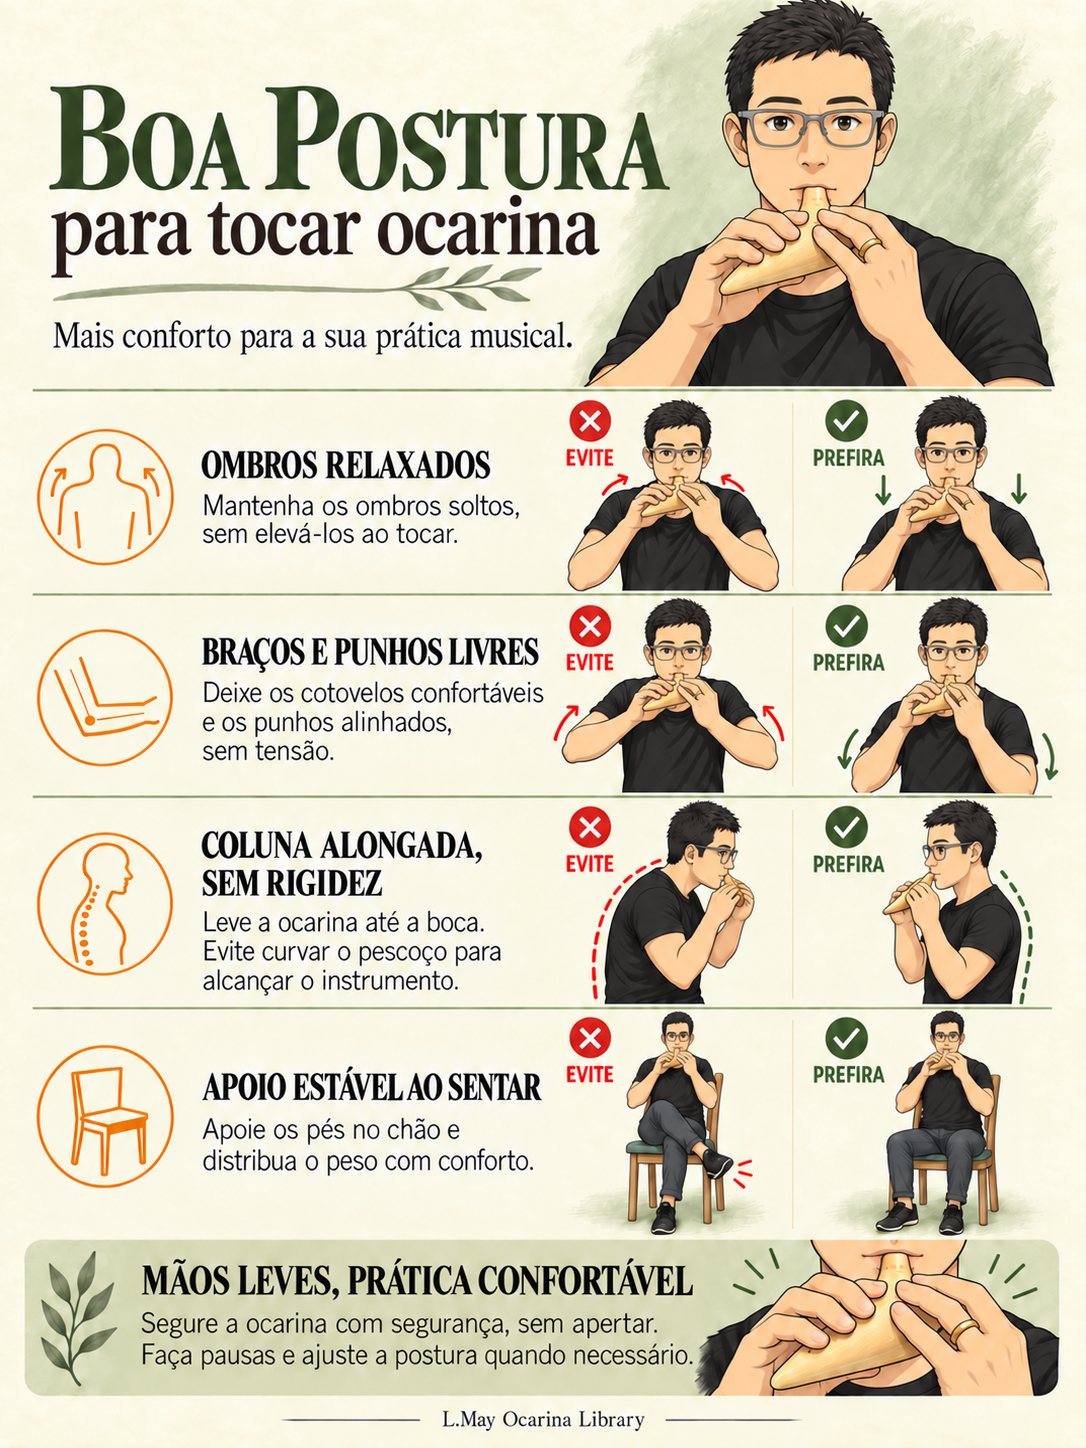
In the image, notice that comfortable posture starts even before your fingers come into play: relaxed shoulders, elbows, and wrists. Bring the ocarina to your mouth instead of bending your neck down toward it. If you’re sitting, keep your feet supported and distribute your weight comfortably. Keep your spine naturally elongated without becoming stiff. If your hands or arms get tired, take a break and adjust your position.
If you have a VentoKanta Alto C, it’s worth checking the VentoKanta Alto C Ocarina Manual. It provides guidance specific to that model. If you own a different ocarina, follow its manufacturer’s manual and fingering chart instead.
3. Start with the Natural Notes
The natural notes are C, D, E, F, G, A, and B. I’d start by learning just one or two at a time, always referring to your fingering chart. Fingering diagrams are often the same for similar ocarinas from different manufacturers, but there can be differences! So don’t assume that a chart made for another instrument will work exactly the same way.
Whenever you find ocarina tablature, check that it was created for the same tuning and type of ocarina you own. Tablature shows which holes to cover, while sheet music shows the notes and rhythm. I think tablature is a great starting point, but I also recommend learning to read sheet music gradually. That way, you’ll be able to explore a much wider range of music.
If terms like staff, rhythm, clef, or accidentals still sound complicated, don’t worry: you don’t need to know everything before you start playing. I’ve prepared a free music theory course for Alto C Ocarina that you can refer to whenever you want to understand these topics better.
What About Sharps and Flats?
Sharps and flats alter the pitch of natural notes. Fingerings can vary depending on the note and the ocarina model, so refer to the chart for your specific instrument. At first, I suggest focusing on natural notes and melodies that fit comfortably within your ocarina’s range. We can add accidentals later, one step at a time.
4. Control Your Breath and Play Each Note in Tune
When your tuner shows that a note is flat, it’s tempting to blow harder. But that’s not always the solution. On the ocarina, air pressure affects both pitch and tone quality. Too little air can make a note unstable, while too much pressure can make it sharp and shrill. I recommend starting with a steady breath and gradually adjusting the pressure while listening carefully to the sound.
Let’s try an exercise with the tuner: choose a comfortable note, check your fingering, and blow steadily. Slowly adjust your breath pressure until the note becomes stable. Then repeat with other notes. Over time, you’ll get to know how your ocarina responds and learn to tell whether a problem comes from your breath, a poorly covered hole, or the instrument itself.
Tap "Enable microphone" to start pitch detection.
The highest notes may require a few adjustments. On transverse ocarinas, the acute bend is a technique that can help stabilize certain high notes by slightly changing the instrument’s angle and your chin position. It’s easier to understand when you see it in action: watch my acute bend demonstration, or jump to 12:26 in the introductory video. Take your time, and don’t force your breath to reach a note.
Every ocarina has its own range. Blowing harder and harder in an attempt to overblow a note into the next octave simply doesn’t work on an ocarina and will inevitably make the sound go out of tune or break off entirely. Stay within the intended range of your instrument.
5. Articulate Notes and Practice Rhythm
To start each note clearly, try using the syllable “tu”. Your tongue gently interrupts and releases the airflow. You don’t need to say it out loud: just use the tongue movement to guide the attack of each note. Once you get the hang of it, try a softer articulation using “du”.
During the exercises, play one note at a time and try to keep the sound steady. If an exercise calls for separated notes, articulate each one individually. Later, you’ll encounter slurs, where one note connects to the next without a new tongue attack. For now, let’s focus on making each articulation clean and consistent.
A metronome is a great practice companion for keeping a steady beat. Start slowly, playing one note per beat. Only increase the tempo once you’re comfortable with the fingering, rhythm, and intonation.
6. Three Exercises for Your First Practice Routine
Now let’s put everything into practice with three exercises I demonstrate in the video. Play everything slowly. If a note doesn’t sound right, stop, check your fingers, and start again at a slightly slower tempo. Try to articulate each note gently and maintain a steady sound.
Exercise 1 — C Major Scale
Play the scale ascending and descending:
Start with one beat per note. Once you’re comfortable, try playing two notes per beat. Increase the tempo gradually; there’s no need to rush to keep up with the metronome.
Exercise 2 — Repeated Notes
Repeat the last note as you move up and down the scale.
Then work your way back down, repeating each note. Here, I want you to pay attention to whether you can articulate each note clearly while maintaining a steady beat.
Exercise 3 — Ascending and Returning
In this exercise, the idea is to ascend to C and then return to the note where you started. Here’s how:
In this exercise, we start on low C, ascend to high C, then come back down and stop on low C. Next, start on D and ascend to high C, then descend to low C and finish on D. After that, start on E and ascend to high C, then descend to low C and finish on the E where you started. Continue with the following notes only as long as they remain comfortable within your instrument’s range. If it gets too difficult, stop there and come back to it later.
When you’re ready to try a song, you can start with the Song of Time tablature or the Epona Song tablature. Both are listed in the Library as beginner-level repertoire for Alto C ocarina.
7. Take Care of Your Ocarina
Moisture can accumulate inside your ocarina while you play. If the sound becomes muffled or stops coming out properly, take a break and follow the manufacturer’s care instructions. Avoid inserting objects into the windway or using cleaning methods that aren’t recommended in the manual. Proper care can vary depending on whether your ocarina is made of plastic, ceramic, or wood.
When you finish playing, store your ocarina somewhere safe from falls and impacts. Ceramic ocarinas can break, and every instrument deserves a safe place. If you’re unsure about cleaning or storage, check the manual for your model.
If you’d like an idea for a case to store and carry your instrument, take a look at Make Your Own Ocarina Case.
8. Keep Learning with Other People
You don’t have to learn alone. I’m part of the Trovadores do Amanhã community, an active group where people discuss the instrument, share recordings, and exchange tips. If you’d like to meet other ocarina players and ask for advice whenever you have a question, join the WhatsApp group.
I also recommend my own YouTube channel and Vinícius Quesada’s channel, Trovadores do Amanhã. And whenever you’re ready to keep learning, explore the articles, tablatures, and sheet music in the Library. Here are a couple of useful shortcuts: the buying guide and the free music theory course.
A Simple Plan for Your First Week
- Days 1 and 2: get familiar with proper posture and practice a few natural notes using your instrument's fingering chart.
- Days 3 and 4: check individual notes with the tuner and try playing the C major scale very slowly.
- Days 5 and 6: practice repeated notes and ascending and descending patterns with the metronome.
- Day 7: choose a short melody, play it at a relaxed pace, and write down what you'd like to practice the following week.
You don’t have to follow this plan to the letter. Even a short, focused practice session counts. Whenever something feels difficult, try breaking it down: work on the finger movements first, then the articulation, rhythm, and intonation. Once you’re comfortable with each part, put everything back together.
Once natural notes and short melodies start to feel more comfortable, you might want to think about what to study next. In the article The 5 Levels of Ocarina Skill, I share some ideas for developing your technique and repertoire. Use them as inspiration, without treating skill levels or estimated learning times as a test you have to pass. Everyone learns at their own pace. Happy practicing — and enjoy the journey!